
DIY garden planters from recycled materials are a creative and eco-friendly way to enhance your garden. They help reduce waste and add a personal touch to your outdoor space.
Imagine turning everyday items into beautiful garden planters. It’s not only budget-friendly but also helps the environment. By reusing materials like plastic bottles, old tires, and wooden crates, you can create unique and charming planters. This project is perfect for anyone who loves gardening and DIY crafts.
Plus, it’s a fun activity that can involve the whole family. You don’t need to be a gardening expert or have a large budget. With a little creativity and some basic tools, you can transform trash into treasure. Ready to start your DIY garden project? Let’s dive in!
Introduction To Diy Garden Planters
Creating your own garden planters can be a fun and rewarding project. You can use recycled materials to make unique and eco-friendly planters. This way, you not only save money but also help the environment.
Importance Of Recycling
Recycling helps reduce waste in landfills. It also saves resources and energy. Using recycled materials for garden planters is a great way to recycle. It gives new life to old items and reduces the need for new products.
Benefits Of Eco-friendly Planters
Eco-friendly planters are good for the earth. They reduce waste and pollution. They are also often cheaper than new planters. Making your own planters can be a fun and creative activity. It allows you to personalize your garden and express your style.
Another benefit is durability. Recycled materials can be very strong. This means your planters will last a long time. Also, by using what you have, you create less demand for new materials. This helps conserve natural resources.
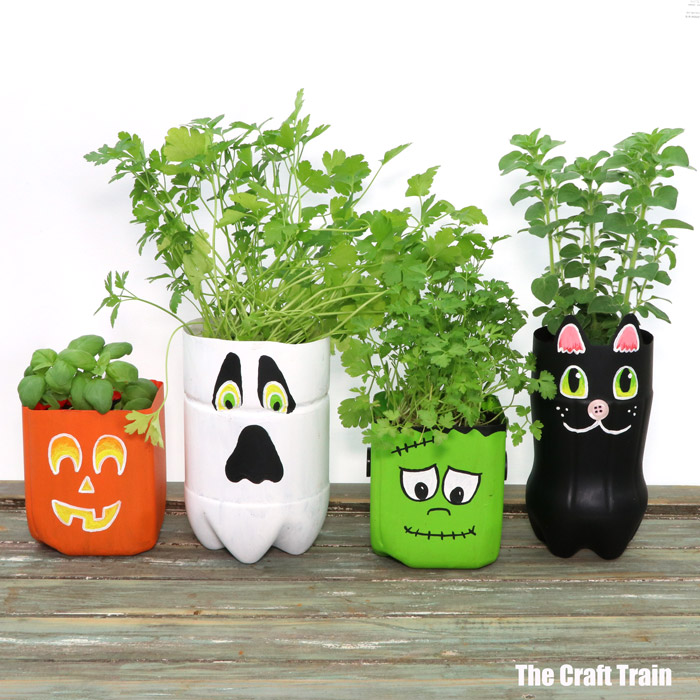
Credit: www.thecrafttrain.com
Choosing Recycled Materials
Creating DIY garden planters from recycled materials is a fun and eco-friendly way to spruce up your garden. Selecting the right recycled materials is essential for durability and plant health. This guide helps you choose the best materials while ensuring safety.
Common Recyclables
Many household items can be repurposed into garden planters. Here are some common options:
- Plastic Bottles: Easy to cut and shape. Ideal for small plants.
- Tin Cans: Durable and can be painted for a decorative touch.
- Wooden Pallets: Perfect for larger planters. Can be disassembled and reassembled.
- Old Tires: Sturdy and great for larger plants. Can be stacked for depth.
- Glass Jars: Provide a unique aesthetic. Best for indoor use due to fragility.
Safety Considerations
While using recycled materials, safety should be a priority. Here are some tips to keep in mind:
- Clean Thoroughly: Wash all materials to remove chemicals or residues.
- Check for Sharp Edges: Sand down any sharp edges to prevent injuries.
- Use Non-Toxic Paints: If painting your planters, choose non-toxic, plant-safe paints.
- Ensure Proper Drainage: Drill holes in the bottom of containers to allow water to escape.
- Consider Material Durability: Choose materials that can withstand outdoor conditions.
Plastic Bottle Planters
Plastic bottle planters offer a creative way to recycle and beautify your garden. These DIY planters are not only eco-friendly but also budget-friendly. You can transform old plastic bottles into unique, decorative planters. This guide will help you create and decorate your very own plastic bottle planters.
Steps To Create
First, gather your materials. You will need plastic bottles, a sharp knife, soil, and plants. Clean the bottles thoroughly to remove any residue. This ensures a healthy environment for your plants.
Next, cut the bottle. Make a horizontal cut in the middle. You can use the top or bottom half as the planter. Poke small holes at the bottom for drainage. Good drainage prevents root rot.
Fill the bottle with soil. Leave some space at the top for your plant. Now, plant your chosen greenery. Water it lightly. Your plastic bottle planter is ready for decoration.
Decorating Ideas
Paint your bottles. Use bright colors to make them stand out. You can create patterns or simple designs. Paint can also protect the plastic from sun damage.
Wrap the bottles with fabric. Old clothes or scarves work well. Secure them with glue. This adds a soft texture and unique look to your planters.
Use stickers or washi tape. They are easy to apply and come in many designs. Change them often to keep the look fresh.
Hang your planters. Attach a rope or string. Hang them from a balcony or tree branch. This saves ground space and creates a vertical garden.
Combine different sizes and shapes of bottles. This adds variety to your garden. Mix and match for a playful and artistic display.
Tin Can Planters
Creating garden planters from recycled materials is a fun and eco-friendly project. One of the easiest and most effective ways is using tin cans. They are readily available and versatile. With some creativity, tin cans can become beautiful and unique planters.
Preparation And Planting
Before you start, gather your tin cans. Wash them thoroughly to remove any residue. Next, make drainage holes at the bottom using a nail and hammer. This ensures that the plants do not get waterlogged.
Once the cans are ready, fill them with soil. Choose a good quality potting mix. Plant your favorite herbs, flowers, or small vegetables. Water the plants and place the planters in a sunny spot. Regularly check for water needs.
Creative Designs
You can transform your tin cans into beautiful planters with a bit of creativity. Here are some ideas:
- Paint the cans in bright colors. Use weatherproof paint to ensure longevity.
- Wrap the cans with decorative paper or fabric. Secure with glue.
- Add labels to identify the plants. This is especially useful for herbs.
- Use stencils to create patterns or shapes on the cans.
For a more rustic look, leave the cans as they are. The metal look can complement many garden styles. Arrange the cans in groups for a more striking effect. Hang them on a fence or wall for a vertical garden.
Remember, the key is to have fun and let your creativity shine. Happy gardening!
Wood Pallet Planters
Transforming old wood pallets into garden planters is a fantastic way to recycle. This eco-friendly project adds charm to any garden space. Wood pallet planters are durable, versatile, and cost-effective. Let’s dive into the basics of building and finishing these unique planters.
Building Basics
To start, gather the necessary materials. You will need:
- Wood pallets
- Hammer
- Nails
- Saw
- Measuring tape
- Wood glue
Begin by dismantling the wood pallets. Use a hammer to remove the nails carefully. Once you have the planks, measure and cut them to the desired size. Use wood glue and nails to assemble the frame.
Ensure the planter has proper drainage. Drill holes at the bottom of the frame. This prevents waterlogging and keeps your plants healthy.
Finishing Touches
After building the frame, it’s time to add the finishing touches. Sand the wood to smoothen the surface. This prevents any splinters and gives a polished look.
Next, you can paint or stain the wood. Choose a color that complements your garden. Use weather-resistant paint to protect the wood from elements. Let it dry completely before planting.
Finally, line the interior with landscape fabric. This keeps the soil in place while allowing water to drain. Your wood pallet planter is now ready for soil and plants.
Wood pallet planters are a great DIY project. They are simple to make and add a rustic touch to your garden. Start building your own today!
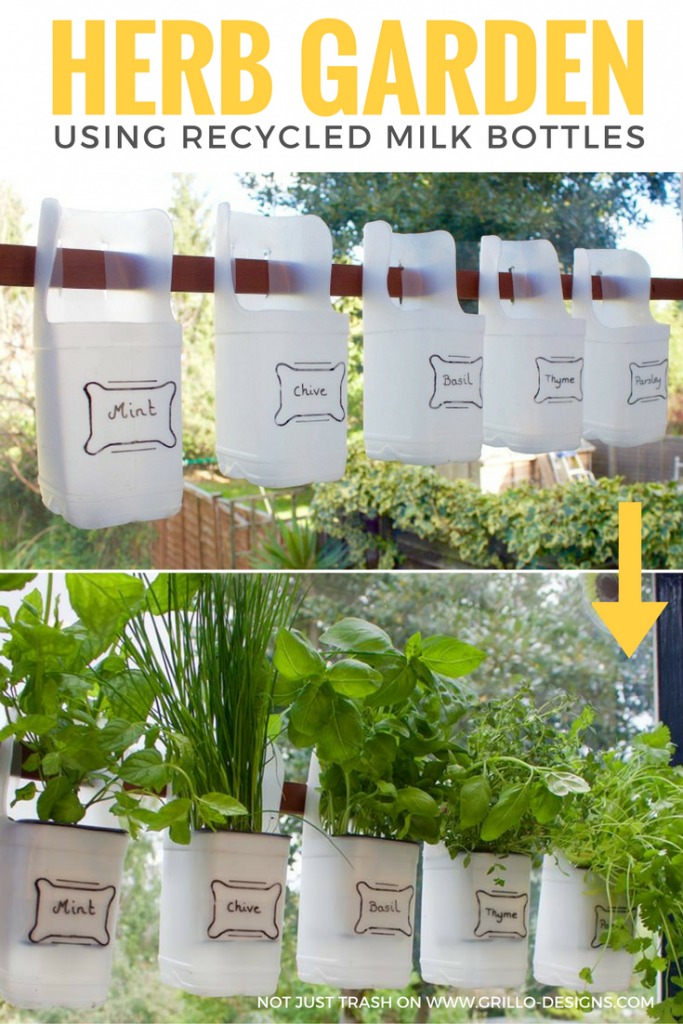
Credit: grillo-designs.com
Glass Jar Planters
Recycling glass jars into planters is a fun and eco-friendly way to add greenery to your space. Glass jar planters are simple to create and can make a stylish addition to your home or garden. They are also a great way to repurpose old jars that might otherwise be thrown away. Let’s dive into some planting techniques and display tips for your glass jar planters.
Planting Techniques
Starting with the right planting technique is essential for healthy plants.
- Choose the right jar: Pick a jar that is large enough for the plant’s roots. Small jars work well for herbs and succulents.
- Create drainage: Since glass jars do not have drainage holes, add a layer of pebbles at the bottom to prevent waterlogging.
- Use the right soil: Fill the jar with potting soil that suits your plant’s needs. For succulents, use cactus soil mix.
- Plant carefully: Place the plant gently in the jar and cover its roots with soil. Ensure the plant is upright and stable.
- Water wisely: Water the plant sparingly to avoid overwatering. Glass jars do not have drainage, so check the soil moisture regularly.
Display Tips
Displaying your glass jar planters can enhance the aesthetics of your space.
| Location | Tip |
|---|---|
| Windowsills | Place jars where they can get plenty of sunlight. Avoid direct sunlight for delicate plants. |
| Kitchen Counters | Use small glass jars for herbs like basil and mint. They are handy for cooking. |
| Bookshelves | Arrange jars at different heights. This adds a dynamic look to your shelves. |
| Outdoor Spaces | Group several jars together on a patio table. It creates a focal point in your garden. |
Glass jar planters are versatile and can fit into any decor style. Whether you place them indoors or outdoors, they are sure to bring a touch of nature to your space.
Repurposing Old Tires
Using old tires as garden planters is a smart and eco-friendly idea. Tires are durable and can hold soil well. Plus, they add a unique look to your garden. Let’s dive into how you can transform old tires into beautiful planters.
Cleaning And Preparing
First, ensure your tires are clean. This is important for a fresh start.
- Use a stiff brush to scrub away dirt.
- Rinse the tires with water.
- Allow them to dry completely.
Cleaning helps paint stick better and keeps the soil healthy.
Painting And Planting
Painting tires adds a splash of color to your garden. Follow these steps:
- Choose a bright, weather-resistant paint.
- Apply a primer coat first. Let it dry.
- Paint the tires with your chosen color. Apply two coats for better coverage.
Once the paint is dry, it’s time to plant. Here’s how:
| Step | Description |
|---|---|
| 1. Fill | Add soil to the tire, filling it almost to the top. |
| 2. Plant | Place your chosen plants in the soil. |
| 3. Water | Water the plants well to settle the soil. |
Now, enjoy your new garden planters made from recycled tires!
Maintenance Tips
Maintaining your DIY garden planters from recycled materials is crucial. Proper care ensures they last longer and keep your plants healthy. Here are some key maintenance tips to follow.
Watering And Drainage
Ensure your planters have proper drainage. Drill holes at the bottom if necessary. Without drainage, water can accumulate. This can lead to root rot. Water your plants regularly but avoid overwatering. Check the soil moisture before adding more water. Use a watering can for better control.
Seasonal Care
Adjust care routines with the seasons. In the summer, water more frequently. The heat can dry out the soil quickly. In winter, water less often. Plants grow slower in the cold. Move sensitive plants indoors during frost. Use mulch to protect roots from extreme temperatures. Always clean your planters before a new planting season. Remove old soil and debris. This prevents disease and pests from spreading.
Conclusion And Inspiration
Creating garden planters from recycled materials is a rewarding experience. It helps the environment and adds a unique touch to your garden. This section aims to inspire and conclude our journey of DIY garden planters.
Showcase Of Ideas
Recycled materials offer endless possibilities for garden planters. Consider using old tires as colorful plant holders. Paint them bright colors for a fun look. Wooden pallets can be transformed into vertical gardens. Attach small pots or containers to the slats. Tin cans make excellent herb planters. Paint them or leave them rustic for charm. Glass bottles can serve as mini greenhouses. They can protect tender plants from cold winds.
Encouraging Sustainability
Using recycled materials promotes sustainability. It reduces waste and saves resources. Instead of throwing items away, give them a new purpose. This practice teaches valuable lessons to children. They learn the importance of recycling and creativity. Your garden becomes a living example of eco-friendly practices. Plus, it saves money. No need to buy new planters. Old items can have a second life in your garden. Let your creativity flow. Inspire others with your unique planters.

Credit: www.youtube.com
Frequently Asked Questions
What Materials Can Be Recycled For Garden Planters?
Many materials can be recycled for garden planters. Examples include plastic bottles, tin cans, wooden pallets, and old tires. These items are eco-friendly and cost-effective. Using recycled materials also adds a unique touch to your garden.
How Do You Make Garden Planters From Bottles?
Cut the bottle in half. Use the bottom half as the planter. Poke holes for drainage. Fill with soil and plant your seeds or plants. Decorate the bottle as desired.
Are Recycled Planters Durable?
Yes, recycled planters can be durable. The longevity depends on the material used. For example, plastic bottles and tin cans last longer than wood. Proper care can also extend the lifespan of recycled planters.
What Are The Benefits Of Using Recycled Planters?
Using recycled planters reduces waste and is eco-friendly. They are cost-effective and often unique. They also promote creativity and sustainability in gardening. This helps reduce the carbon footprint.
Conclusion
Creating DIY garden planters from recycled materials can be fun and rewarding. It helps reduce waste and adds unique charm to your garden. Plus, it’s cost-effective and eco-friendly. Start with simple projects and experiment with various materials. Your garden will look amazing with these personalized touches.
Happy gardening!