
Making a wreath from scratch can be a fun and rewarding project. It allows you to add a personal touch to your home decor.
Creating a wreath from scratch is easier than you might think. With a few simple materials and some creativity, you can craft a beautiful wreath that reflects your style. Whether you want a festive holiday wreath or a decorative piece for any season, the process can be enjoyable and fulfilling.
In this guide, we will walk you through the steps to make your own wreath. You don’t need to be a crafting expert; just follow along and you’ll have a lovely wreath to display in no time. Ready to get started? Let’s dive in!
Materials Needed
Creating a wreath from scratch can be a fun and rewarding project. To get started, you need to gather the essential materials. These will ensure your wreath is sturdy and beautiful. Below, you’ll find the basic supplies and optional decorations that will help you craft the perfect wreath.
Basic Supplies
- Wreath base: Choose a base made of wire, foam, or grapevine. The base holds all the elements of your wreath together.
- Floral wire: Use floral wire to secure decorations and greenery to the base. It is flexible and easy to work with.
- Wire cutters: These are essential for cutting floral wire and trimming stems.
- Scissors: Use scissors to cut ribbons and other soft materials.
- Hot glue gun: A hot glue gun helps to attach decorations that can’t be wired. It provides a strong hold.
- Greenery: Fresh or artificial greenery gives your wreath a full and lush look.
Optional Decorations
- Ribbons: Add ribbons for a touch of color and elegance. Choose ribbons that match your theme.
- Pinecones: Pinecones add a rustic and natural element. They are perfect for winter and fall wreaths.
- Flowers: Use fresh or artificial flowers to add beauty. Flowers can match the season or your personal style.
- Berries: Artificial berries provide a pop of color. They are great for holiday-themed wreaths.
- Ornaments: Small ornaments can make your wreath festive. They are ideal for Christmas wreaths.
- Lights: Battery-operated lights add a magical touch. They make your wreath shine, especially at night.
:max_bytes(150000):strip_icc()/christmas-lake-tahoe-wreath-making-detail-8930-d111862_vert-70a452468b8a4d8bbe8b8a5c2e39499e.jpg)
Credit: www.marthastewart.com
Choosing A Base
Creating a wreath from scratch starts with choosing the right base. The base is the foundation of your wreath. It affects the final look and durability. Picking the right base is crucial for a beautiful wreath.
Types Of Bases
There are several types of bases to choose from. The most common include wire, foam, and grapevine. Each type has its own benefits and uses.
A wire base is flexible and lightweight. It’s perfect for intricate designs. Foam bases are great for inserting flowers and greenery. They provide a solid structure. Grapevine bases offer a natural look. They are sturdy and hold items well.
Selecting The Right Size
The size of your base depends on where you plan to hang your wreath. For a front door, a 14 to 18-inch base works well. For smaller spaces, a 10 to 12-inch base might be better.
Think about the final look you want. A larger base allows for more decorations. A smaller base is simpler and less crowded.
Consider the weight of your decorations too. A larger base can support heavier items. Make sure your base size fits your vision and needs.
Preparing The Base
Creating a wreath from scratch involves a few essential steps. The first and most important step is preparing the base. A well-prepared base ensures your wreath will look beautiful and last longer. Let’s dive into the details of preparing the base for your DIY wreath.
Cleaning And Prepping
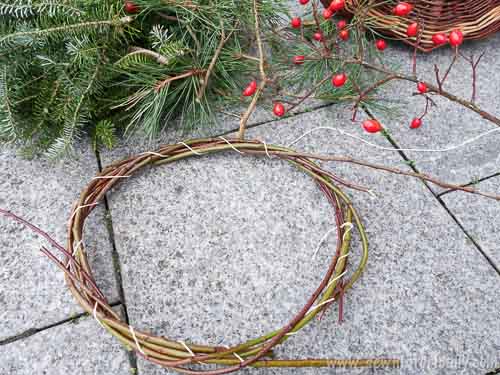
Start by gathering your materials. You will need a wreath form, which could be made of wire, foam, or grapevine. Ensure the wreath form is clean and free from dirt. Use a damp cloth to wipe off any dust or debris. Allow it to dry completely.
Next, decide on the greenery or foliage you want to use. Fresh or faux, the choice is yours. If using fresh greens, trim the stems and remove any dead leaves. This helps the materials last longer. For faux greens, check for any broken or damaged pieces. Fix or discard them to ensure a polished look.
Securing The Base
Now, it’s time to secure the base. Attach the greenery to the wreath form. Use floral wire or hot glue, depending on your materials. Start by laying the greenery around the form. Make sure it covers the base evenly. Secure each piece by wrapping the wire or applying glue.
Work your way around the wreath form. Overlap the greenery to avoid gaps. Keep the design balanced. Check your progress frequently. Adjust as needed to maintain a uniform look. Once all the greenery is secured, give the wreath a final inspection. Ensure everything is firmly attached and looks neat.
With the base prepared, you are now ready to add decorations. Your wreath will now have a solid foundation. This step sets the stage for a beautiful and lasting creation.
Gathering Greenery
Creating a wreath from scratch starts with gathering greenery. The right plants and leaves can make your wreath look beautiful and full. Let’s dive into the best plants to use, how to cut them, and how to arrange them.
Best Plants To Use
Choosing the right greenery is key to a stunning wreath. Here are some great options:
- Evergreen: Pine, fir, and cedar are classic choices. They stay fresh for a long time.
- Eucalyptus: Adds a lovely scent and unique texture.
- Holly: Perfect for a festive look with its bright red berries.
- Laurel: Offers lush, green leaves that are easy to work with.
- Boxwood: Great for a dense, full appearance.
Cutting And Arranging
Proper cutting and arranging ensure your greenery looks its best. Follow these steps:
- Gather tools: Use sharp pruning shears for clean cuts.
- Cut stems: Cut stems about 6-8 inches long. This length is easy to handle.
- Group greenery: Make small bundles of 3-4 stems. This helps create a fuller look.
- Attach bundles: Use floral wire to attach bundles to your wreath frame. Overlap each bundle slightly for fullness.
- Fill gaps: Add extra stems to fill any gaps. This makes your wreath look even and complete.
By following these steps, you can create a beautiful, lush wreath that brings joy to your home.
Attaching Greenery
Attaching greenery is a crucial step in making a wreath from scratch. It brings life and color to your wreath. You need to secure the greenery properly for a lasting and beautiful look. Let’s dive into the techniques for attaching greenery to your wreath base.
Using Wire And Tape
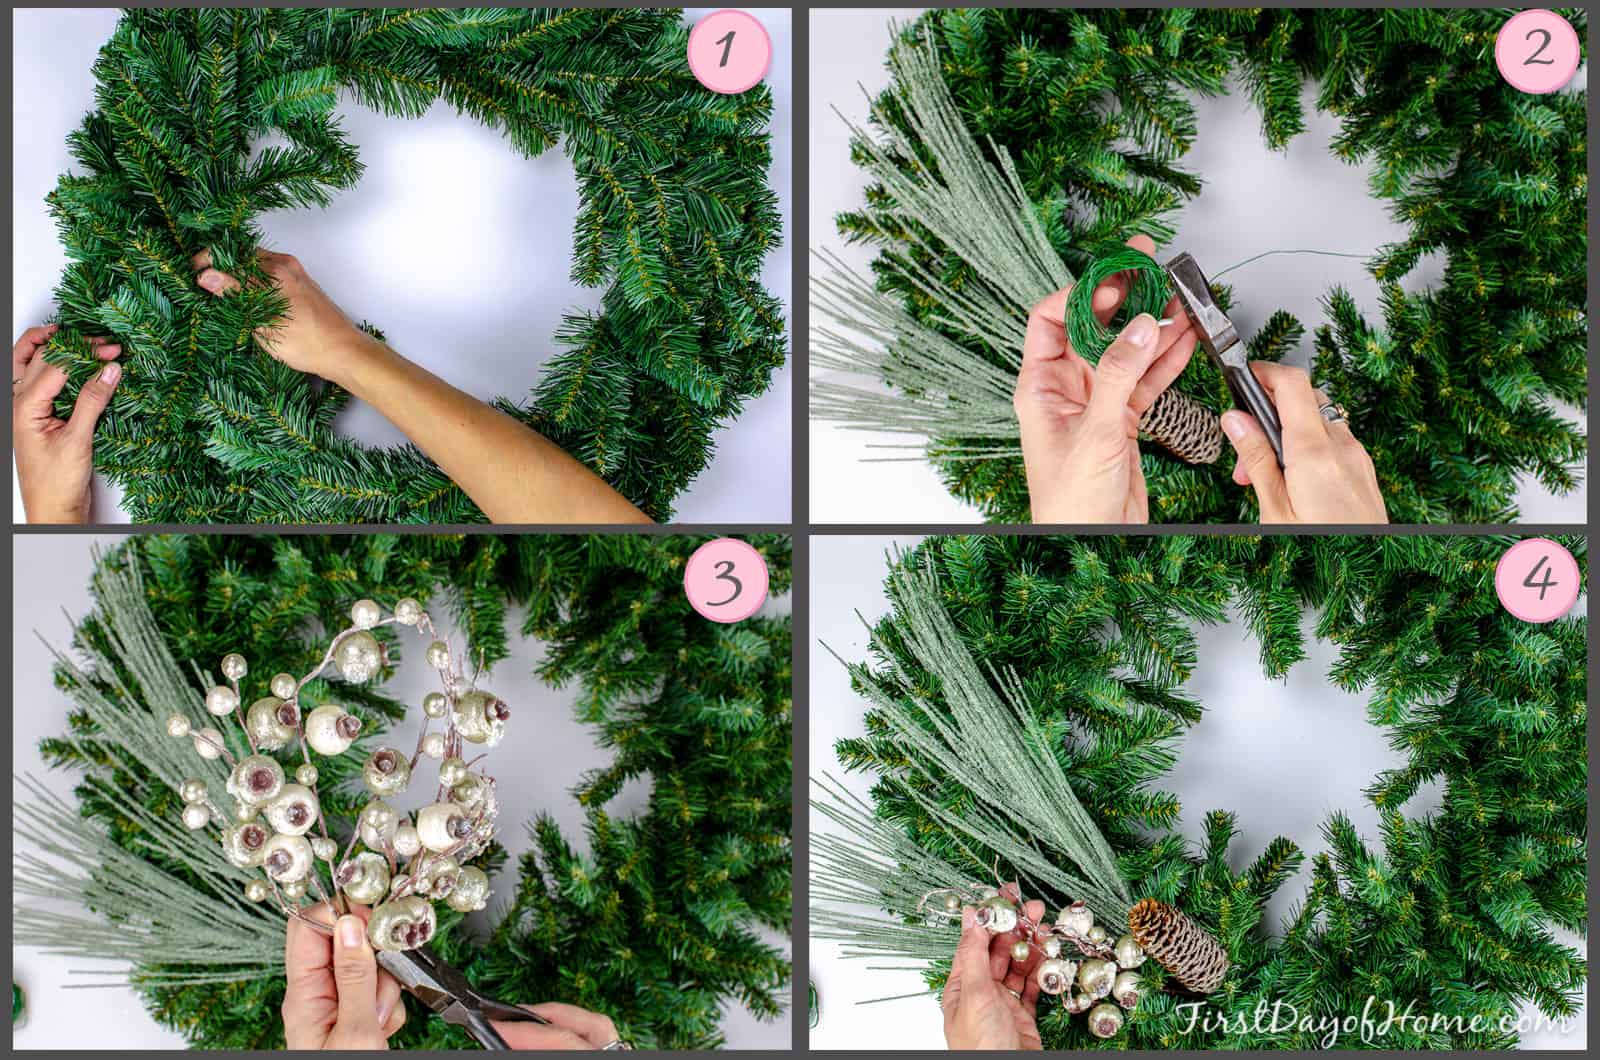
Start by gathering your greenery. Use a mix of leaves, branches, and flowers. Cut them into manageable pieces. Use floral wire to attach these pieces to your wreath base.
Wrap the wire around the stem and the base. Twist the wire to secure it. Repeat this process with more greenery until your wreath is full.
Floral tape can also help. It provides extra security. Wrap the tape around the stem and base. Press it firmly to ensure it sticks.
Layering Techniques
Layering adds depth to your wreath. Start with a base layer of greenery. This can be larger leaves or branches.
Next, add another layer of smaller leaves and flowers. Place them between the larger pieces. This creates a balanced look. Continue layering until you achieve the desired fullness.
Mix different textures and shades of green. This makes your wreath more interesting. Ensure each layer is securely attached.
Remember, the key to a beautiful wreath is in the details. Take your time. Enjoy the process. Your effort will show in the final product.
Adding Decorations
Adding decorations to your wreath can transform it from simple to stunning. This step lets you personalize your wreath. You can use a variety of items to reflect your taste and style. Below are some tips for choosing and placing decorations.
Choosing Ornaments
Choosing the right ornaments is key to a beautiful wreath. Here are some tips:
- Theme: Decide on a theme. It could be festive, rustic, or elegant.
- Color Scheme: Stick to a color scheme. This will ensure a cohesive look.
- Size: Use a mix of small and large ornaments. This adds depth and interest.
- Types: Consider different types of decorations. Berries, pinecones, ribbons, and baubles are great options.
Use your creativity. Choose ornaments that speak to you. This makes your wreath unique.
Placement Tips
Placement of your decorations is as important as choosing them. Follow these tips:
- Balance: Distribute ornaments evenly. Avoid clustering too many in one spot.
- Layering: Layer different types of decorations. Place larger ones first, then fill gaps with smaller items.
- Symmetry: Aim for symmetry. Place similar items opposite each other for a balanced look.
- Attachment: Secure decorations well. Use floral wire or hot glue to keep them in place.
Remember to step back and look at your wreath often. Adjust as needed for a pleasing arrangement.
Final Touches
Adding the final touches to your homemade wreath brings it to life. This stage allows you to personalize and perfect your creation. Let’s explore how to secure loose ends and add a beautiful bow.
Securing Loose Ends
First, check your wreath for any loose ends. These might be stray branches or ribbons. Use floral wire to secure these parts tightly. Cut off any excess wire to keep things tidy. This step ensures your wreath looks neat and lasts longer.
Adding A Bow
A bow can add charm and color to your wreath. Choose a ribbon that complements your theme. Make a simple looped bow or a more elaborate one. Attach the bow to the wreath using wire or hot glue. Place it at the top or bottom for a balanced look.

Credit: www.youtube.com
Displaying Your Wreath
Displaying your wreath is an essential part of the process. It showcases your hard work and creativity. Whether you hang it on your front door, a wall, or a window, it’s important to do it right. Here are some tips to make sure your wreath looks its best.
Hanging Methods
Choosing the right hanging method can make a big difference. Here are a few options to consider:
- Over-the-Door Hooks: These are easy to use and require no tools. Simply hook it over the top of your door.
- Command Hooks: These are adhesive hooks that stick to your door or wall. They are great for a damage-free solution.
- Ribbon: Loop a ribbon through your wreath and hang it from a nail or hook. This adds a decorative touch.
Maintenance Tips
To keep your wreath looking fresh, follow these maintenance tips:
- Dust Regularly: Use a soft cloth or a feather duster to remove dust.
- Spray with Water: For live wreaths, mist with water to keep them hydrated.
- Store Properly: When not in use, store your wreath in a cool, dry place. Use a wreath storage box if possible.
By following these tips, you can ensure your wreath remains a beautiful addition to your home decor.
Credit: www.firstdayofhome.com
Frequently Asked Questions
What Materials Are Needed To Make A Wreath?
To make a wreath, you’ll need a wreath form, floral wire, scissors, and decorations like greenery, flowers, or ribbons.
How Long Does It Take To Make A Wreath?
Making a wreath usually takes about 1-2 hours. This depends on the complexity and design of your wreath.
Can I Use Artificial Flowers For A Wreath?
Yes, artificial flowers are a great choice. They last longer and can be reused for different occasions.
What Type Of Wreath Form Should I Use?
You can use foam, grapevine, or wire wreath forms. The choice depends on your preferred design and materials.
Conclusion
Creating a wreath from scratch is fun and rewarding. Follow the steps outlined. Gather your materials, plan your design, and start crafting. Enjoy the process and let your creativity shine. Each wreath you make will be unique and personal. Display your handmade wreath proudly.
Share your creation with friends and family. They will appreciate your effort and talent. Happy crafting!