
Travel photos capture our best adventures. They remind us of places we’ve been.
Creating a travel photo wall at home can keep those memories alive and inspire future trips. It transforms your space and tells your unique story. Are you looking to display your travel memories creatively? Travel photo wall ideas are perfect ways to showcase your adventures.
It adds a personal touch to your home decor while sparking joy every time you see those cherished moments. From simple frames to elaborate collages, there are countless ways to design your travel photo wall. Whether you have a few favorite shots or a vast collection, you can create a stunning visual journey right in your living room. Let’s explore some inspiring ideas to get you started!
Table of Contents
Credit: tripmapworld.com
Choosing The Perfect Wall
Creating a travel photo wall can be a wonderful way to showcase your adventures. The first step is choosing the perfect wall. This decision can impact the overall look and feel of your photo display. Consider the location and space available to ensure your travel memories shine.
Best Locations
High-traffic areas are ideal for travel photo walls. Hallways, living rooms, and entryways work well. These spots allow everyone to enjoy your photos. Another great location is above a sofa or a bed. This makes the display a focal point in the room.
Office spaces can also be excellent for travel photo walls. They add a personal touch and spark inspiration. Avoid placing photos in areas with direct sunlight. This can cause the pictures to fade over time.
Considerations For Space
Space plays a crucial role in designing your travel photo wall. Measure the wall area before you start. This helps in planning the layout and choosing the right frame sizes. Large walls can handle bigger frames and more photos. Small walls might need a more minimalistic approach.
Think about the overall style of your room. Your photo wall should complement the decor. Use uniform frames for a cohesive look. For a more eclectic style, mix different frame types and sizes. Also, leave some space between frames. This ensures the wall doesn’t look cluttered.

Credit: www.aeroscroll.com
Selecting Your Photos
Creating a travel photo wall can be a fun and rewarding project. The first step is selecting the right photos. This process can be enjoyable and filled with nostalgia. Below are some tips to help you choose the best images for your travel photo wall.
Favorite Travel Memories
Start by picking your favorite travel memories. Choose photos that bring a smile to your face. Select moments that are special to you. These could be from a beautiful beach, a bustling city, or a quiet village. Think about the experiences that you cherish the most. These photos will make your wall personal and meaningful.
Photo Quality Tips
Photo quality is important for a stunning display. Ensure your photos are clear and sharp. Blurry images won’t look good on a wall. Check the resolution of your photos. High-resolution images print better and look more professional. Pay attention to the lighting in your photos. Well-lit images with good contrast stand out more. If needed, edit your photos to enhance their quality before printing.
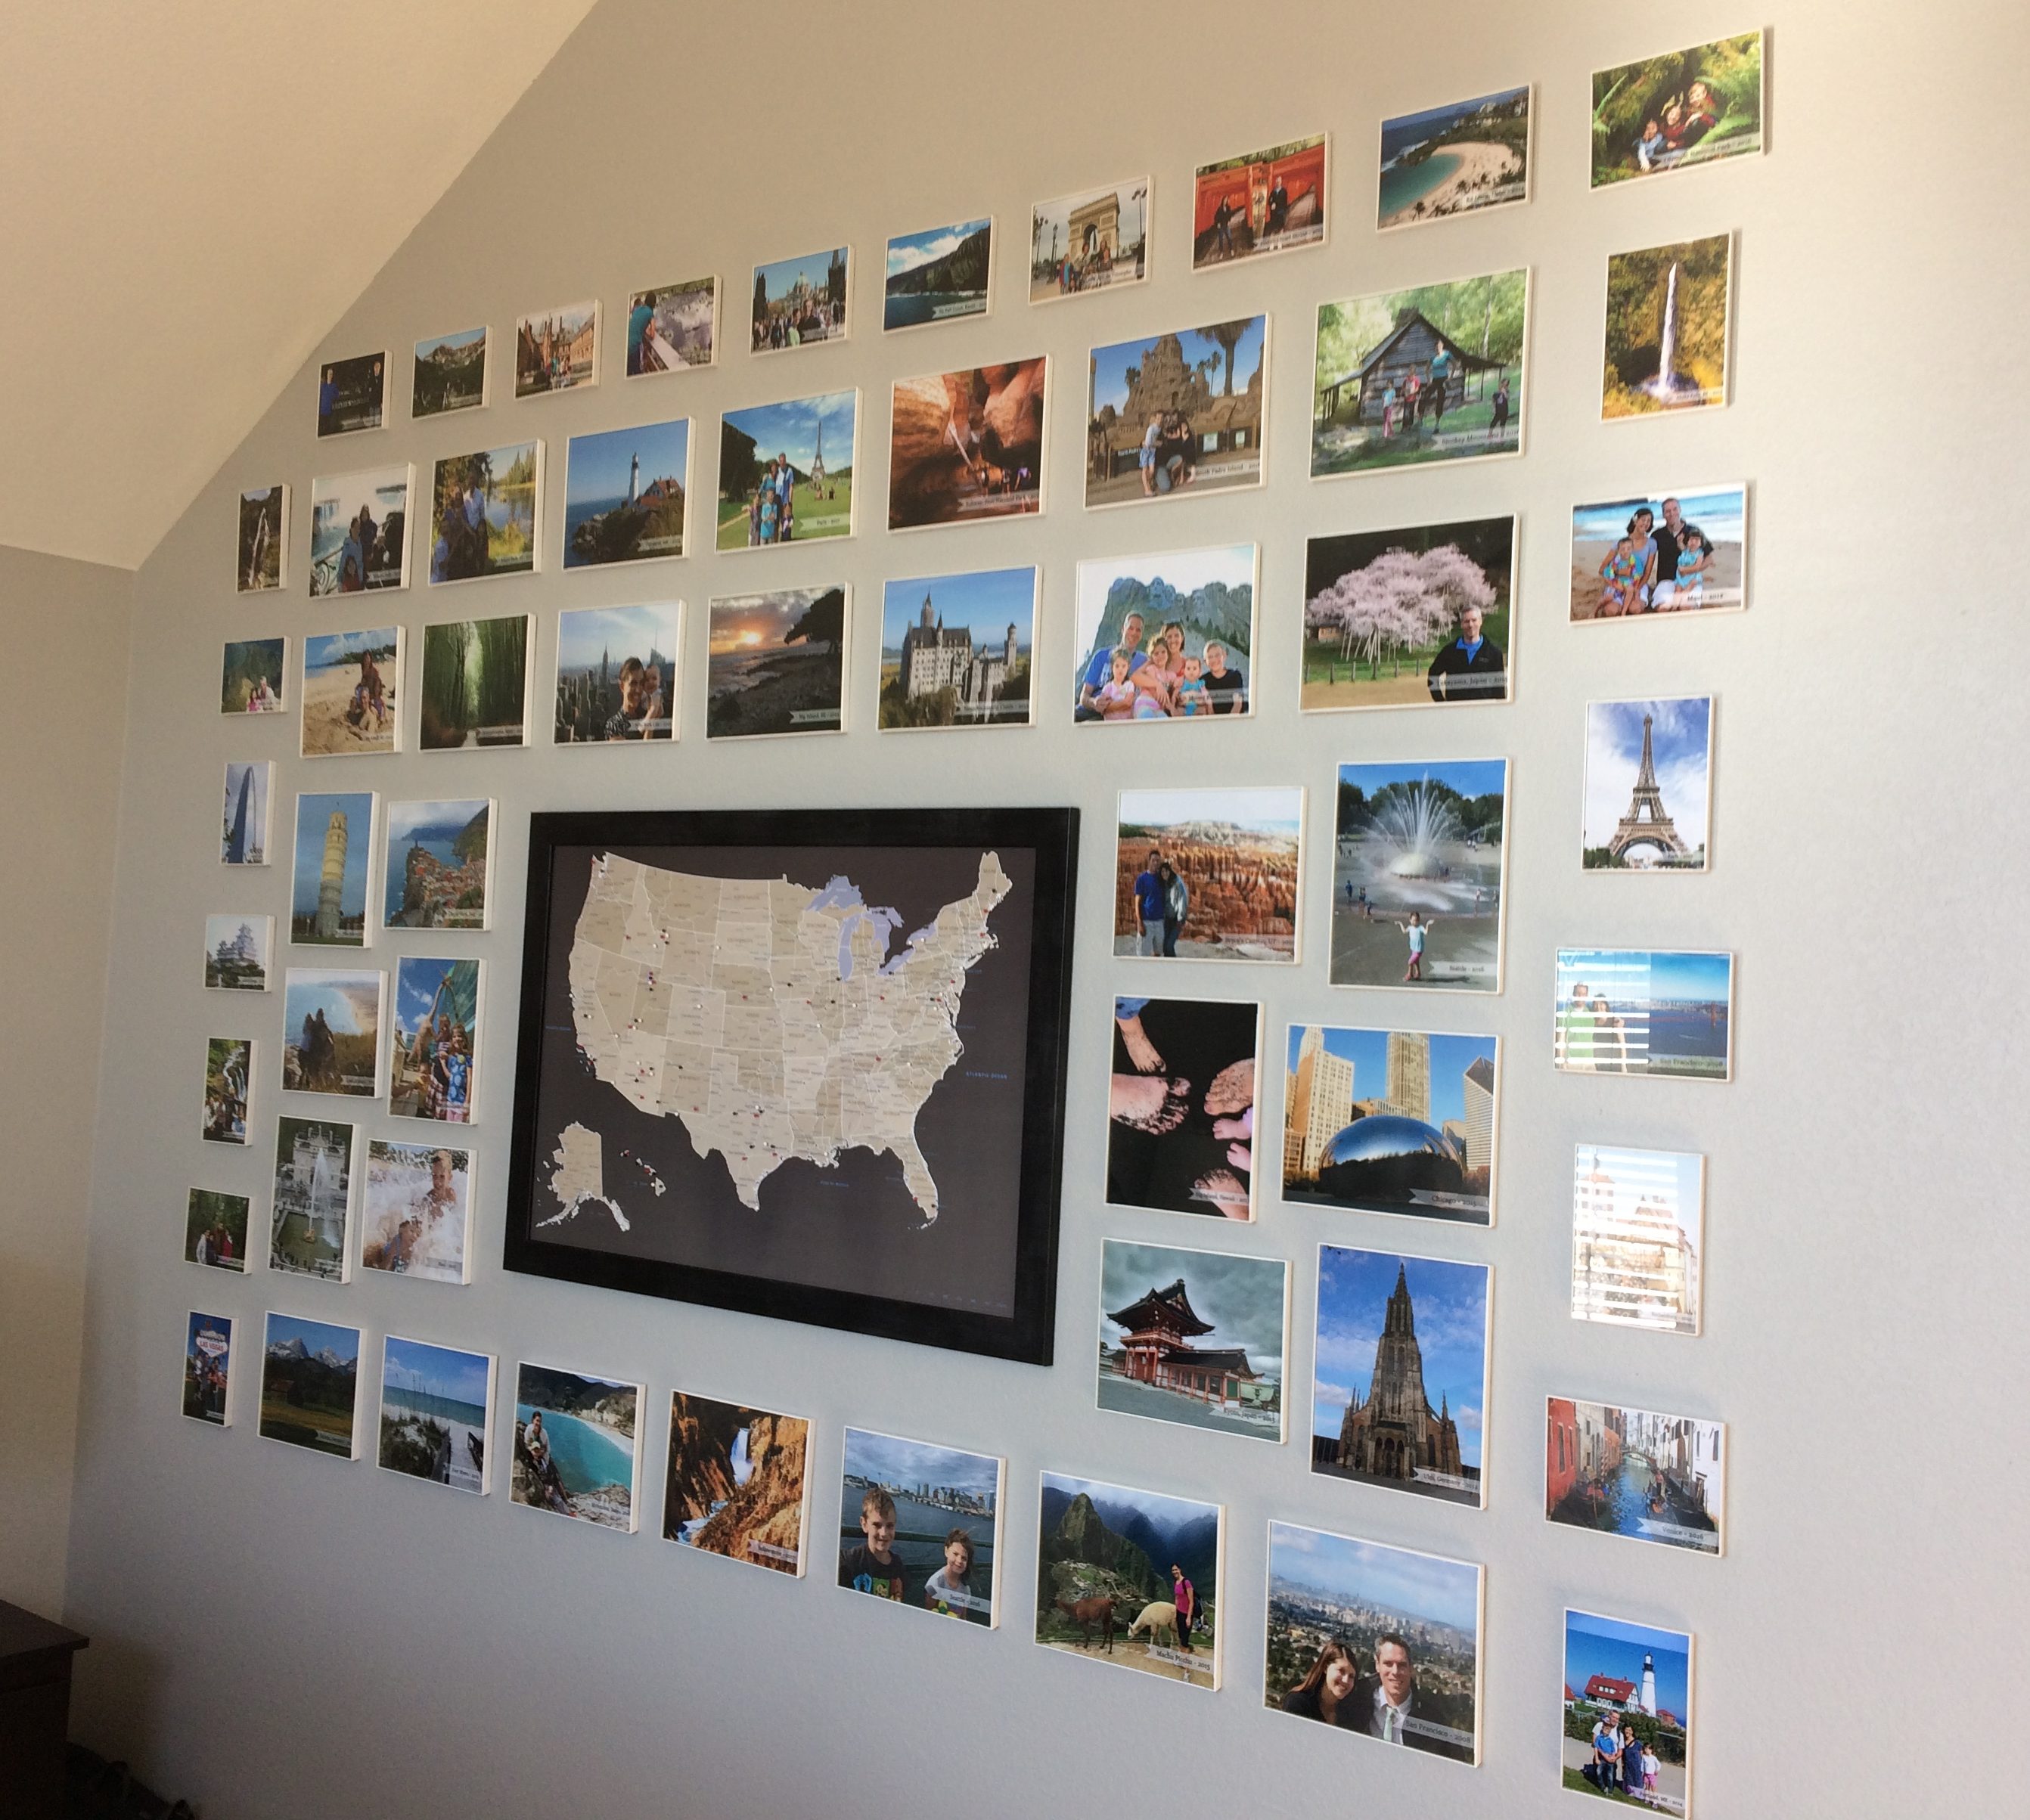
Arranging Your Layout
Creating a travel photo wall can be a delightful way to showcase your adventures. Arranging your layout is the key to making your photo wall visually appealing. A well-organized layout can transform your memories into a stunning display. Let’s explore some tips on arranging your layout.
Symmetry Vs. Asymmetry
Symmetry involves arranging photos in a balanced and orderly fashion. This method brings a sense of harmony. It works well in formal spaces. Use photos of similar sizes to achieve a uniform look. Symmetrical layouts are easy to plan. They provide a clean, structured appearance.
Asymmetry, on the other hand, offers a more relaxed and creative look. It involves placing photos of different sizes and shapes. The arrangement feels more dynamic and spontaneous. Asymmetrical layouts are perfect for casual spaces. They allow for more creativity and freedom.
Spacing And Alignment
Proper spacing ensures your photo wall does not look cluttered. Maintain equal gaps between each photo. This creates a sense of order. It also makes the display easier on the eyes. Use a ruler or a measuring tape for accuracy.
Alignment is also crucial. Align the top or bottom edges of your photos for a neat look. You can also align the photos along a central line. This keeps the display consistent. Proper alignment contributes to the overall aesthetic appeal. It makes your travel photo wall a joy to look at.
Framing And Mounting Options
Choosing the right framing and mounting options can transform your travel photo wall. The right frame can enhance the beauty of your pictures. It also protects them from damage. Mounting ideas can add a unique touch to your display. Here, we will explore different types of frames and DIY mounting ideas.
Types Of Frames
Frames come in various styles and materials. Each type offers a different look and feel to your photo wall.
- Wooden Frames: These frames give a classic and timeless look. They are sturdy and durable.
- Metal Frames: Modern and sleek, metal frames suit contemporary decor. They are lightweight and robust.
- Plastic Frames: Affordable and versatile, plastic frames come in many colors and styles. They are perfect for a playful photo wall.
- Floating Frames: These frames create a magical effect. It looks like your photo is floating within the frame.
Diy Mounting Ideas
Mounting your photos can be a fun DIY project. Here are some creative ideas to inspire you:
- Washi Tape: Use colorful washi tape to create borders around your photos. It’s easy to apply and remove.
- Clipboards: Hang clipboards on the wall and clip your photos. It’s easy to change the pictures whenever you want.
- String and Clips: Hang a string across your wall and use clips to attach your photos. This creates a casual, charming look.
- Magnetic Boards: Place your photos on a magnetic board. Use magnets to hold them in place. It allows you to rearrange them easily.
- Frames without Glass: Remove the glass from old frames. Use the empty frames as a unique way to display your photos.
Each of these ideas can add a personal touch to your travel photo wall. Choose the one that best fits your style and space.
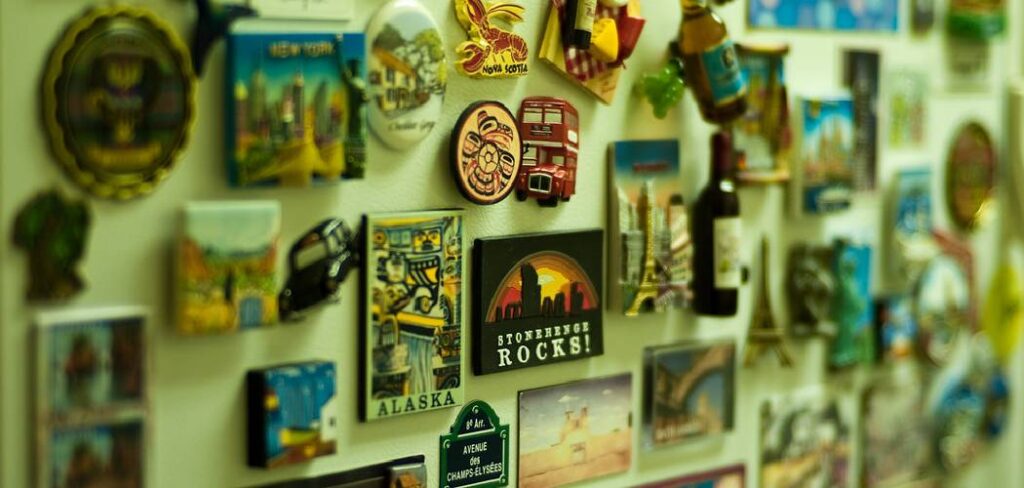
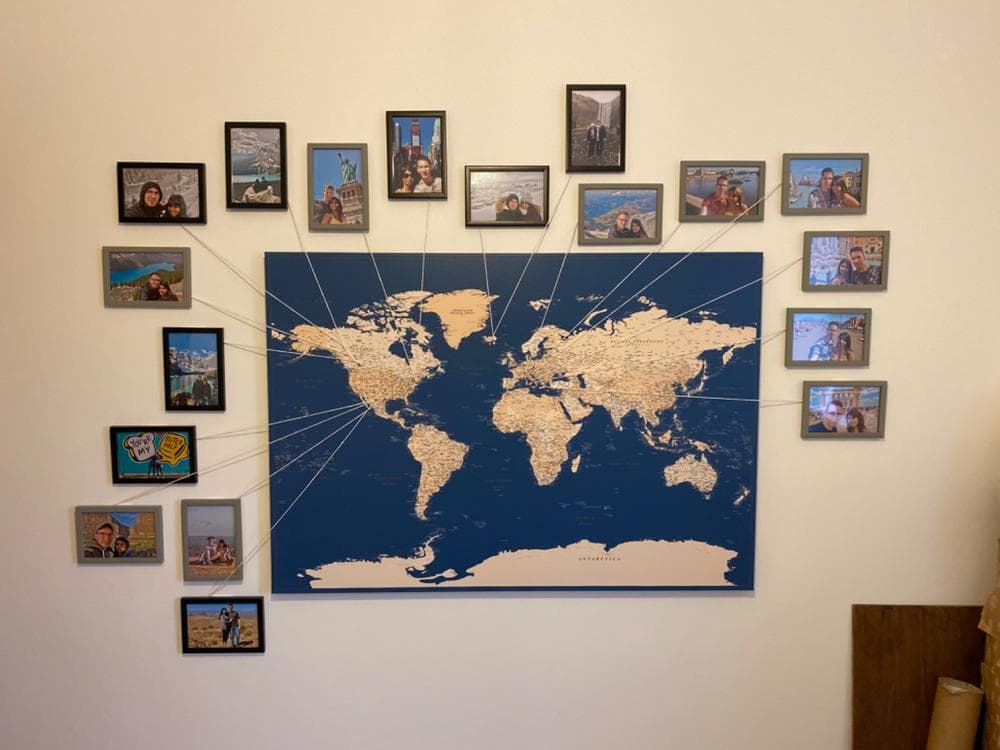
Incorporating Travel Memorabilia
Create a travel photo wall by displaying cherished travel memorabilia alongside your favorite photos. Use maps, tickets, and postcards to add a personal touch.
Creating a travel photo wall is a wonderful way to relive your adventures. Adding travel memorabilia makes it even more special. These items tell stories that photos alone cannot. They bring texture and depth to your display. Here are some ideas to get you started.
Souvenirs And Keepsakes
Souvenirs can transport you back to your travels. Consider displaying items like postcards, maps, or tickets. These small items hold big memories. Arrange them around your photos for a dynamic look. Use shadow boxes to give them a special place. This adds dimension and protects fragile items.
Keepsakes such as shells, coins, or keychains also work well. They add a personal touch to your wall. Pin them directly to the wall or use small shelves. This way, your keepsakes become part of the art.
Mixed Media Displays
Mixing different media creates an interesting visual effect. Combine your photos with paintings or drawings from your travels. Hang a piece of local art next to your photos. It connects your memories with the culture of the place.
Incorporate textiles like scarves or fabric swatches. These add color and texture to your display. You can frame them or hang them loosely. This makes your travel wall more vibrant and engaging.
Consider adding a small bulletin board. Pin notes, small trinkets, or even dried flowers. This interactive element invites you to keep adding to your wall. It evolves as you continue to travel and collect more memories.
“`
Lighting Your Display
Creating a stunning travel photo wall is about more than just pictures. The right lighting can enhance your display, making your memories shine. Let’s explore how to illuminate your travel photo wall.
Natural Light
Natural light brings out the true colors of your photos. Place your photo wall near a window. Morning or late afternoon light works best. Harsh midday sun can cause glare. Use sheer curtains to diffuse the light. This softens the effect and avoids direct sunlight.
Artificial Lighting Tips
Not all rooms have ample natural light. Use artificial lighting to highlight your photos. LED lights are a great choice. They are energy-efficient and provide consistent light. Track lighting or picture lights can focus on specific photos. Choose warm white bulbs for a cozy feel.
String lights add a whimsical touch. Drape them around the photo wall for a festive look. Ensure the lights are not too bright. You want to enhance, not overpower, your photos. Use dimmable lights for adjustable brightness.
Adding Personal Touches
Creating a travel photo wall is a great way to relive your adventures. Adding personal touches makes it even more special. Personalizing your photo wall transforms it into a unique piece of art. Your travel memories deserve to be displayed beautifully.
Custom Captions
Custom captions can add meaning to your travel photos. Write short descriptions for each photo. Mention the place, date, or a memorable event. Use colorful markers or printed labels for a neat look. Handwritten notes add a personal feel. Captions make your photo wall more engaging and informative.
Decorative Elements
Decorative elements enhance your travel photo wall. Use items like postcards, maps, or souvenirs. Frame your photos with colorful borders. Add fairy lights for a warm glow. Incorporate small shelves to hold travel trinkets. Use washi tape to create fun patterns. These elements make your photo wall lively and interesting.
Maintaining Your Photo Wall
Keeping your travel photo wall looking fresh and vibrant is essential. Regular maintenance helps to preserve your memories and ensures that your display remains a focal point in your home. Here are some tips to keep your photo wall in top condition.
Cleaning And Dusting
Dust can accumulate on your photo frames over time. Use a soft cloth or a feather duster to gently remove dust from your frames. Avoid using harsh chemicals or cleaning agents. They can damage the frames and photos. A microfiber cloth dampened with water is often enough to clean the glass on the frames.
For metal frames, a simple wipe with a dry cloth will suffice. Wooden frames might need a bit more care. Use a wood cleaner specifically designed for your type of wood. Remember to clean the wall itself around the frames. Dust can settle there too.
Updating With New Photos
Your travels don’t stop, and neither should your photo wall. Update your photo wall regularly with new pictures from recent trips. This keeps the wall fresh and exciting. It also allows you to relive your newest adventures.
To organize your updates, consider a system. Perhaps you replace the oldest photos with the newest ones. Or, you could have a rotating schedule where every few months, new photos are added while some are temporarily stored. This keeps your wall dynamic and ever-evolving.
| Type of Frame | Cleaning Method |
|---|---|
| Metal Frame | Dry cloth |
| Wooden Frame | Wood cleaner |
| Glass Frame | Damp microfiber cloth |
By following these simple tips, you can keep your travel photo wall looking stunning. Preserve your cherished memories and enjoy a beautiful display of your adventures. Happy travels!
Credit: flybytheseatofourpants.com
Frequently Asked Questions
How Do I Arrange Travel Photos On A Wall?
Start by selecting a theme or color palette. Mix different frame sizes and styles. Arrange photos in a visually pleasing layout. Use a level to ensure straight lines. Consider adding other travel-related decor items.
What Is The Best Way To Display Travel Photos?
The best way is to create a gallery wall. Use a mix of frames and sizes. Keep the layout balanced. Arrange photos in a grid or a more organic pattern. Add travel souvenirs for extra flair.
How Can I Make A Travel Photo Wall Interesting?
Add variety by mixing photos with travel memorabilia. Use maps, postcards, and tickets. Choose frames that complement your decor. Play with different layouts. Include captions or labels for a personal touch.
Should I Use Frames For Travel Photo Walls?
Yes, using frames protects your photos and adds a polished look. Choose frames that match your style. Mix and match different frame sizes and colors. This adds depth and interest to your display.
Conclusion
Creating a travel photo wall brings memories to life. It’s a fun project. Choose your favorite moments and display them with style. Your wall tells your unique story. Friends and family will enjoy seeing your adventures. It adds a personal touch to your space.
Get creative and make your wall a focal point. Enjoy the process and let your travels inspire you every day. Happy decorating!
